How Do You Find the Time?

"How do you find the time?"

I get asked that question a lot and I really don't know the answer. I know that I just do the thing that I get enjoyment from and the things that need to be done.

A single parent, a working professional, someone who loves to read, knit, craft and create, someone who is working really hard to create a good life for herself and her kids. I know I'm not the only one out there, and I enjoy reading the blogs of others, so I thought, "well, why not?" So here we go!

Sunday, February 12, 2012

How about something sweet?

So before I talk about food, I should talk about where I am today.    Just this week, I have noticed a huge change in my energy levels and what I am able to do at the gym.    In our workout with our trainer, Moses, this weekend, there were substantial changes from where I was on January 1.   I was able to hold the planks a lot longer and was able to do some things I didn't think I could do - box jumps, while a bit scary, felt really good once I managed to do them.    I noticed too, that it's much easier to get up off of the floor and today on the elliptical, I was able to go harder for longer.     I'm down 16 pounds and I am feeling great!  

My kids have been bugging me to make something sweet.     Something that I love but never make is a pumpkin roll.  It just looks too time intensive for me.    So when I found this recipe, I knew I had to try it and did today.  

Pumpkin Roll Bars
from here: 

Ingredients:

Cake
6 tablespoons unsalted butter, melted
1 1/2 cups granulated sugar
2 large eggs
1 (15 oz.) can pumpkin 
1/4 cup water
2 cups all-purpose flour
2 teaspoons ground cinnamon
1/2 teaspoon ground cloves
1/2 teaspoon ground ginger
1/2 teaspoon ground nutmeg
1 teaspoon vanilla
1 teaspoon baking soda
1/2 teaspoon baking powder
1/4 teaspoon salt

Cream Cheese Filling
8 ounces cream cheese, softened
1/4 cup granulated sugar 
1/2 teaspoon vanilla
1 large egg

Directions:

Preheat oven to 350 degrees.  Spray a 9 x 13 inch baking pan with non-stick cooking spray. In a bowl, with an electric mixer on medium speed, beat butter and 1 1/2 cups sugar until smooth. Beat in 2 eggs, pumpkin, 1 teaspoon of vanilla and water until well blended.  In a separate bowl, mix flour, cinnamon, cloves, ginger, nutmeg, baking soda, baking powder, and salt; add the dry ingredients to the pumpkin/butter mixture and combine until well blended. Spread about 2/3 of the batter evenly into the prepared pan.

In a bowl, with an electric mixer on medium speed, beat cream cheese, 1 egg, 1/4 cup sugar, and ½ teaspoon of vanilla until smooth. Spread cream cheese mixture evenly over the pumpkin batter. Dollop the remaining pumpkin batter over the cream cheese batter and spread out as evenly as possible.  Use a table knife to swirl together the cream cheese and top layer of pumpkin batter.  Bake for 30-35 minutes, or until the center of the pumpkin batter springs back when touched. Cool completely in pan, then cut into bars.

My notes:     I did this just as written.    The sugar and butter did not get "creamy" but I just added the other ingredients and it came out really good.   


Saturday, February 11, 2012

Easy Chicken Curry

So last week I created a plan for the whole week.    I found it very helpful and for the most part, we followed it.    One of the recipes that I tried was this one:


from:  http://weelicious.com/2011/11/07/easy-chicken-curry/


Easy Chicken Curry


Easy Chicken Curry (Serves 4)
1 Tbsp Olive Oil
1 Small Onion, diced
1 Garlic Clove, minced
1 Red Bell Pepper, seeded and cubed into 1 inch pieces
1 lb Chicken Breasts, boneless, skinless and cubed
2 Tsp Curry Powder
1 1/2 Tsp Kosher Salt
2 Tbsp Tomato Paste
2 Medium Carrots, peeled and sliced into coins
1 Large Russet Potato, peeled and cubed into 1 inch pieces
1-14 oz Can Light Coconut Milk
1/2 Cup Frozen Peas

Accompaniments: white or brown rice
1. Heat 1 tbsp of olive oil in a medium pot over medium heat and sauté the onions for 4 minutes. Add the minced garlic and bell peppers, sauté an additional minute.
2. Add the cubed chicken, sauté for 2 minutes, stir in the curry powder, salt, tomato paste, carrots and potatoes until they are all coated.
3. Pour in the coconut milk and stir to combine. Bring to a boil, cover and reduce heat to a simmer for 10 minutes.
4. Remove lid, add the frozen peas and simmer an additional 15 minutes.
5. Serve over rice.

My notes:    I pretty much followed this recipe as written except that I substituted edamame for the peas, I used boneless, skinless chicken thighs, I added twice as much curry powder and I added about a tablespoon of siracha because I believe that curry should have a kick to it.  


There were four of us eating dinner and we had probably enough for two more servings left.    I'd had rice in the freezer, so I took it out to thaw with the chicken and then reheated it in the microwave.  We had a delicious salad with this too.  

Mini Blueberry-Apple Crisps

So I was chatting with my friend on Facebook this morning and she mentioned a recipe for flour-free blueberry muffins after I said that I was going to have oatmeal for breakfast because that's what I always have.   So I was intrigued and decided to try an experiment.    While they didn't come out like muffins, they were like little blueberry-apple crisps.    I made 18.   I ate two.   There are none left.    I believe that counts as a success!

So, here is what I did:


Ingredients:
2 Gala Apples, cored and chopped
1 cup of fresh blueberries
1/4 cup sugar
sprinkle of cinnamon
sprinkle of allspice
1 Tbsp lemon juice

Mix the above ingredients together and spoon into lined and sprayed (with pan spray) muffin tins.

Topping:
1 1/2 cups oatmeal
1 Egg
1/2 cup melted butter (I think that's why this was so good, but really, it's less than 2 tbsp of butter per "mini crisp")
1/2 cup sugar
sprinkle cinnamon
sprinkle allspice

Mix the above ingredients together and spoon over the top of the fruit and cook in 375 degree oven for between 20 and 30 minutes.   

Yum!

Monday, February 6, 2012

Super Bowl Snacks

We had a great Super Bowl.  Not only did the Giants win, but we went to our friends house and had a lot of fun.     I took a veggie tray with me and then I tried a new recipe for a snack.    This recipe, Spinach Balls or rather, Savory Spinach Bites, was something I wasn't really sure about, but I had all the ingredients in the house, so I decided to try them.      I made a batch of homemade marinara sauce on Saturday and took it with the spinach balls.   Everyone really enjoyed them, I shared some with friends, and I brought some home as well.   They are now in lunches for this week!

From here 

Savory Spinach Bites
Servings: 18-24 spinach bites, depending on how big you make them

Ingredients
1/2 cup (1 stick) unsalted butter
1 small onion, chopped (about 1/2 cup)
1 teaspoon minced garlic (about 1 clove)
2 10-ounces packages frozen chopped spinach, thawed and drained
1 8-ounce bag of herbed seasoned stuffing mix
6 large eggs
1 cup grated Parmesan cheese
Salt and pepper, to taste

Instructions
1. Preheat the oven to 350 degrees.
2. In a large sauté pan over medium heat, melt the butter.
3. Add onion and cook until the onions are translucent and soft, about 5 minutes or so.
4. Add the garlic and cook until fragrant, about 30 seconds.  Remove the pan from the heat and let cool.
5.  In the meantime, remove excess water from thawed spinach by pressing it between paper towels. **You do not need to cook the spinach.
6.  In a large bowl, combine the stuffing mix, spinach, eggs, Parmesan, salt and pepper, and onion/garlic mixture.  Combine well.
7. Line a rimmed baking sheet with parchment paper.
8.  One at a time, using your hands, roll the mixture into individual 1-inch balls.  Place each one on the parchment-lined baking sheet.
9.  Bake the balls for about 15-20 minutes, or until very slightly browned. 

My Notes:    I used a 14 oz bag of Pepperidge Farm Stuffing that was in the cabinet.    I added mozzarella cheesed, shredded, because I ran out of Parmesan cheese, used 10 eggs, and had to add a bit of bread crumbs and dry oatmeal because it was a little too moist.   I also added fresh basil from my basil plant.    

Saturday, February 4, 2012

Meal Planning, February 6 - 12

Life is very busy for us, so I am finding that when I have a plan for meals for the week, it makes things so much easier for all of us.

So for this week, February 6 - 12,  here is the plan:

Breakfasts:    I always have oatmeal with apples, cinnamon and flax seed and either a hard-boiled egg or a piece of string cheese.    The boys find their own breakfast.  (Yes, I know, I will NOT be winning the super mom award.)

Lunches:    I always have a BAS (Big A** Salad) with some protein, which sometimes is what we had for dinner the previous night.    The  boys usually have a sandwich, some fruit and something else.    I think I will make some egg salad with the HB eggs that are in the refrigerator.  Maybe I'll make cookies tonight too...

Dinners:
Monday:   Slow Cooker Honey Parmesan Pork from here.   I'll cook some orzo pasta and we will either have steamed or fresh veggies with it.   ****Edited to add what we actually had:    This recipe instead of the first as I was out of Parmesan cheese.   
Tuesday:  (Gym night)   Leftovers?  Get meatloaf out of freezer
Wednesday:  Meatloaf (from freezer), potatoes, salad or steamed veggies. Check status of leftovers for Thursday - get turkey bacon out of freezer
Thursday:   (Gym night)   Leftovers or breakfast (turkey bacon and eggs) - Cook rice for Friday, get chicken thighs out of freezer to thaw
Friday:  Easy Chicken Curry from here.   Rice, cooked on Thursday, salad.     Use frozen chicken thighs.
Saturday:    Bake Rye bread, cook big pot of beans in crock pot
Sunday:   Chili 

Shopping List:
Carrots
Potatoes
Onions
Apples
Clementines (if on sale)
Bananas
Lunchmeat for lunches for boys

**I'm sharing this blog on Menu Plan Monday at this blog:  http://orgjunkie.com/blog

Friday, February 3, 2012

Ohh Yummy Goodness! Homemade Pop Tarts

So my teenagers are typical teens who really want junk food.  They bug me for specific things and some I will buy and some I won't.    One of the occasional purchases are pop tarts,  but I don't do that too often.     It just bugs me to spend money on something that really isn't very good and isn't that good for you either.     I've been perusing a lot of blogs and Pinterest, looking at different craft projects and recipes.   (I love Pinterest for saving recipes I want to try - much better than bookmarking the page!)    One of the things that I had saved was a recipe for homemade Pop Tarts.   I told the boys that "on the next snow day" I would make pop tarts.    Well, today is the "next snow day."  

We have over a foot of snow on the ground and it is still coming down!

So here are the photos and the recipe for homemade pop tarts!   From here:
http://smittenkitchen.com/2010/04/homemade-pop-tarts/

Homemade Pop Tarts

this is what the dough should look like before adding the liquid
Pastry
2 cups (8 1/2 ounces) all-purpose flour
1 tablespoon sugar
1 teaspoon salt
1 cup (2 sticks or 8 ounces) unsalted butter, cut into pats
1 large egg
2 tablespoons (1 ounce) milk
1 additional large egg (to brush on pastry)

Cinnamon Filling (enough for 9 tarts)
1/2 cup (3 3/4 ounces) brown sugar
1 to 1 1/2 teaspoons ground cinnamon, to taste
4 teaspoons all-purpose flour
1 large egg, to brush on pastry before filling

Jam Filling
3/4 cup (8 ounces) jam
1 tablespoon cornstarch mixed with 1 tablespoon cold water

To make jam filling: Mix the jam with the cornstarch/water in a small saucepan. Bring the mixture to a boil, and simmer, stirring, for 2 minutes. Remove from the heat, and set aside to cool. Use to fill the pastry tarts.

Make the dough: Whisk together the flour, sugar, and salt. Work in the butter with your fingers, pastry blender or food processor until pea-sized lumps of butter are still visible, and the mixture holds together when you squeeze it. If you’ve used a food processor, transfer the mixture to a large bowl. Whisk the first egg and milk together and stir them into the dough, mixing just until everything is cohesive, kneading briefly on a well-floured counter if necessary.
Divide the dough in half (approximately 8 1/4 ounces each), shape each half into a smooth rectangle, about 3×5 inches. You can roll this out immediately or wrap each half in plastic and refrigerate for up to 2 days.
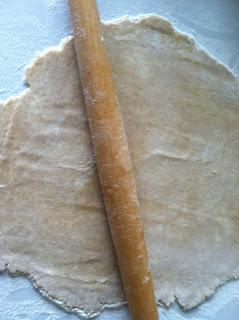
Don't forget to flour the surface on which you are rolling dough out!


Assemble the tarts: If the dough has been chilled, remove it from the refrigerator and allow it to soften and become workable, about 15 to 30 minutes. Place one piece on a lightly floured work surface, and roll it into a rectangle about 1/8″ thick, large enough that you can trim it to an even 9″ x 12″. [You can use a 9" x 13" pan, laid on top, as guidance.] Repeat with the second piece of dough. Set trimmings aside. Cut each piece of dough into thirds – you’ll form nine 3″ x 4″ rectangles.
This is with the egg on the pastry dough

Beat the additional egg and brush it over the entire surface of the first dough. This will be the “inside” of the tart; the egg is to help glue the lid on. Place a heaping tablespoon of filling into the center of each rectangle, keeping a bare 1/2-inch perimeter around it. Place a second rectangle of dough atop the first, using your fingertips to press firmly around the pocket of filling, sealing the dough well on all sides. Press the tines of a fork all around the edge of the rectangle. Repeat with remaining tarts.
Gently place the tarts on a lightly greased or parchment-lined baking sheet. Prick the top of each tart multiple times with a fork; you want to make sure steam can escape, or the tarts will become billowy pillows rather than flat toaster pastries. Refrigerate the tarts (they don’t need to be covered) for 30 minutes, while you preheat your oven to 350°F.

the darker filling is peanut butter and chocolate, the red is raspberry jam

before sealing and crimping edges - don't forget to refrigerate - that's what makes the crust so flaky!


Bake the tarts: Remove the tarts form the fridge, and bake them for 20 to 25 minutes, until they’re a light golden brown. Cool in pan on rack.

cooling.....

looks good enough to eat

yummy and SO flaky!


My Notes:    I substituted 1/2 cup of whole wheat flour for 1/2 cup of white flour.      I needed a bit more milk to get the pie crust to stick together.    I used a raspberry jam filling and I used a peanut butter and chocolate filling.    I did not put any frosting on our pop tarts.  I got 11 pop tarts out of this recipe, along with some extra crust that I sprinkled with cinnamon sugar.  

Verdict:    Delicious and so much better than store bought pop tarts!   The crust was really flaky and oh so yummy!   I'd love to try these with a savory filling as well. 


Now, for some accountability:     
I have lost 15 pounds since January 1!   Yay me!    I made it to the gym between 3 and 4 times each week in the past couple of weeks.    The plan was to go today, but I am hearing that the roads are terrible, so we will stay home.    I did work up quite a sweat shoveling snow, so I am counting that for my exercise today. 

I am seeing a definite improvement in my endurance and in how I am feeling.   I am enjoying the exercise and having fun at the gym.     I've been going to the aquacize and aqua circuit classes, which have been fun, and spending a good deal of time on the elliptical trainers.

I have not been as good at writing down all of my food, so I recommitted to that today.    I'm in a pattern as to what I am eating, so it's easy to not write it down, but it also helps me to be aware of what I am eating.

I'm still working to finish my shawl.   It might get done today!.    I've also got French Onion Soup going on the stove, so I'll blog about that in the next day or two as well.

Happy snow day, everyone!

Some Snow Photos!


Snow Drift on the Deck

We had about 5 feet of the driveway we did not have to shovel!
Shovel that snow!


Driveway After


Driveway After


Sunday, January 22, 2012

What did you do this weekend?

Nothing exciting going on here except for everyday life.    First off, accounting - down a total of 12 pounds so far!   Yay me!     Logged food every day, exercise 4 times this week  (busy meeting week!)   I'm in the process of finishing a UFO - a shawl made from homespun alpaca.   I'm close to the end and will finish it this week!   Woo hoo!

On Monday at school, we had the Black Hands Drummers come to visit our students.  They are amazing, energizing, and just so positive.      We got to get up and dance and sing with them.  I think we should start every day off that way.    Here are Gil and his wife.    They are such wonderful people!

On Saturday, our trainer, Moses tried to kill us!   Not really, but it feels like it today.   My quads are so sore - I think it was from the skating he had me doing on the gym floor with towels under my feet.    I did get a workout in today and soaked some in the hot tub, but I am still sore! 

Lately I've been finding a lot of recipes via Pinterest.    Talk about addicting!     I'm seeing lots of delectable desserts (think hot fudge chocolate cake made in the crockpot), but I have resisted, thinking of the progress I am making.     I have been searching for a few sweet treats to make that won't kill the health routines.    I found these three recipes on there, and that's what's for dinner tonight and lunches this week.   

Slow Cooker Cream Cheese Chicken Chili
from:  http://eatcakefordinner.blogspot.com/2012/01/slow-cooker-cream-cheese-chicken-chili.html
1 can black beans, drained & rinsed
1 can corn, undrained
1 can Rotel (tomatoes & gr. chiles), undrained (I used a 14 oz can of tomatoes and some generous spoonfuls of green chili)
1 pkg. ranch dressing mix (I only used 1/2 package)
1 tsp. cumin
1 Tbl. chili powder
1 tsp. onion powder
1 (8 oz.) pkg. cream cheese
2 chicken breast halves or 5 tenders (I used 6 boneless, skinless thighs, thawed), frozen

Place chicken in bottom of slow cooker.  Combine beans, corn, Rotel, ranch seasoning, cumin, chili powder and onion powder and pour over chicken.  Place stick of cream cheese on top.  Cover and cook on low for 6-8 hours.  Stir cream cheese into chili.  Use 2 forks and shred the chicken.  Stir together and serve.  Yield: 3-4 adult servings.   


Roasted Broccoli and Cauliflower: 
from http://www.amateurgourmet.com/2008/11/the_best_brocco.html

Preheat the oven to 425.

Take 4 to 5 pounds of broccoli and cut into florets (but relatively big ones.)  Dry them THOROUGHLY. That is, if you wash them.

 Put the broccoli on a cookie sheet. Toss with olive oil, salt and pepper. ( 5 Tbs olive oil, 1 1/2 tsps kosher salt, 1/2 tsp fresh ground pepper.) Now add 4 garlic cloves that are peeled and sliced and toss them in too.

Roast in the oven 20 to 25 minutes, until crisp-tender and the tips of some of the florets are browned.

When it’s done, take it out of the oven, zest a lemon over the broccoli, squeeze the lemon juice over the broccoli, add 1.5 Tbs more olive oil, 3 Tbs toasted pine nuts (I left those out), and 1/3 cup of freshly grated Parmesan cheese.

My Notes:   I tossed the broccoli and cauliflower in a ziplock bag with the garlic.    We have had this once before and it was delicious!   I think that the lemon zest and the Parmesan cheese at the end are the best parts of this dish! 


No Bake Granola Bars 

Ingredients
- 1 cup oatmeal
- 1/2 cup peanut butter (or other nut butter)
- 1/3 cup honey
- 1 cup coconut flakes
- 1/2 cup hemp seed (or flax)
- 1 bar (1 oz.) Baker's* dark chocolate (optional)
Directions
Combine all ingredients and mix well.  
Roll into tbsp sized balls.  
Melt chocolate in microwave safe bowl and transfer to a sandwich bag.  Snip a small tip off the corner of the sandwich bag and drizzle away! 
Let balls set in fridge for another 1/2 hour before serving. 
My Notes:   I heated the honey in the microwave, mostly because it had hardened in the container, but it made it easier to mix.    I also heated the peanut butter for the same reason.     I only had about 3/4 of a cup of coconut and I did not use Baker's chocolate.   I used about 1/4 of a cup of chocolate chips and 2 Tbsp of  peanut butter.   I do not have hemp, so I used ground flax seeds - you can't use flax seeds whole unless you soak or cook them.     I did not refrigerate this first, but instead spread it into a cookie sheet on parchment paper and used a rolling pin to flatten it.    I started to drizzle the chocolate/peanut butter mix over it, but then decided to just spread it.   I then put it in the refrigerator and later cut it into squares.   I wrapped each one individually for lunches this week.    Just the sweet touch I was looking for!


And finally, we have been seeing some amazing sunrises this month.   I took this photo when I dropped the boys off at school on Friday morning.   Amazing colors!